As you develop your content, use the accessibility guidelines below and learn how to make the elements accessible.
Use the HTML Templates
Use the template pages provided to create new pages for your course. Use the font size and style provided in the template. It is not recommended to try to change the font size or typeface as it can then be a hassle to try to keep fonts consistent (unless you know how to use Cascading Style Sheets). View previews of the HTML templates and learn how to apply them to your content.
The best thing you can do to make your TCU Online content accessible, is to use the HTML editor to build your content by selecting “Upload/Create” then “Create a File” within the Content tool. This HTML editor includes several built in features for accessibility and can also be leveraged in various tools such as Announcements, Assignments and Discussions.
Use the Accessibility Checker
An accessibility checker is available within the HTML Editor for use within Content, Widgets, Quizzes, Assignments, Calendar, and any other tools where an instructor or student can access the HTML Editor.
The accessibility checker is available on the HTML Editor bar. After you add content to the HTML Editor, you can click the checker to ensure that the HTML page conforms to WCAG and Section 508 accessibility standards.
View the step-by-step guide for using the accessibility checker.
Limitations of the checker
While the accessibility checker can identify many high priority issues with accessibility, there are some limitations.
- Only available in the HTML Editor in TCU Online
- The accessibility checker does not check the following which will require manual review:
- multiple files at the same time
- files that you have imported into a course (MS Word, PDF, PowerPoint, etc). Learn more about making these types of files accessible outside of TCU Online.
- use of a text font that is easy to read
- use properly formatted headings to structure the page specifically when headings (Heading 1, Heading 2, etc) are not used, and when font styling is used instead of formatted headings.
- If alt text provided conveys content and meaning
- When meaningful link text that indicates the link’s destination is missing from a link to a file or URL
- use of color to convey meaning
Text
Use a text font that is easy to read. We recommend using the default font in TCU Online: Arial.
- Avoid using serif fonts for web content. While these are quite legible in print, sans serif fonts tend to be easier to read on a screen.
- Avoid small font size. We recommend using either the default size, or size 3 font for body text.
- If there is an image with text in it, make sure to put the text in the alternative text so it is accessible to users with screen readers.
- Follow the steps below for creating headings in your content for structure.
- Note: The Accessibility Checker will not check use of a text font that is easy to read. This requires a manual check by the instructor/course developer.
Headings
Use properly formatted headings to structure the page. Making headings larger and bold is not enough to designate them as a heading. Instead Headings need to formatted as headings.
Note: The Accessibility Checker will not check use properly formatted headings to structure the page specifically when headings (Heading 1, Heading 2, etc) are not used, and when font styling is used instead of formatted headings. This requires a manual check by the instructor/course developer.
Heading Tips:
- Consider Heading 1 to be like a book title. Typically you only use one Heading 1 on a page. Heading 2s are like chapter titles and Heading 3s are sub-sections of those chapters, etc.
- Heading order is similar to an outline order
- Headings MUST be used in order. Don’t skip levels
- Do not use headings to achieve visual results only
- Headings help chunk material to make the content easier for everyone to read.
- Headings are an important part of navigating content for users with a screen reader.
- More information & tips for structure and lists in HTML can be found on WebAIM.
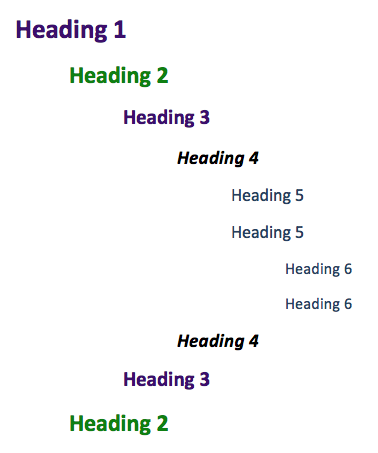
Example of possible order that headings might be used.
How-to select paragraph Headings:
- In TCU Online, within the HTML editor in your content, highlight the text you want to which you want to assign a heading.
- Then select the paragraph styling dropdown menu on the tool bar within the HTML editor and select the Heading level. In the example below, Heading 1 is selected from the dropdown menu.
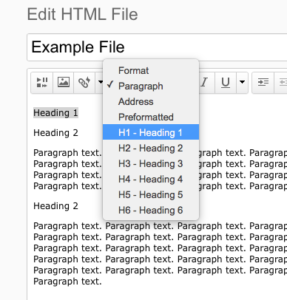
Highlight your text, then select the Heading level from the format dropdown list.
- Repeat these steps for any additional headings.
- Click Update or Publish to save your changes.

Captions for Audio and Video
Transcripts are recommended for all media but synchronized closed captions are preferred.
Audio & Video Tips
- Audio:
- A transcript of relevant content is provided for non-live audio-only (audio podcasts, MP3 files, etc.).
- A transcript or audio description of relevant content is provided for non-live video-only, unless the video is decorative.
- Video
- Synchronized captions are provided for non-live video (YouTube videos, etc.).
Add Captions for an Audio Topic in TCU Online
When instructors Create an Audio Topic in a content module, the next step is to Add Closed Captions to Audio Content with the Media Editor.
Add Captions for a Video Topic in TCU Online
When instructors Create a Video Topic in a content module, the next step is to Edit Video Content with the Media Editor to add closed captions.
Add Captions to Video Notes
When instructors and students Create and insert a video note in HTML Editor, they are prompted (in step 8) to select the audio language and automatically generate captions. Instructors can then revise the captions in the Media Editor, if needed.
Lists
Format Lists as lists. Formatting, such as lists, headings and links, are read by screen reader to users, so the content is understood in context.
Lists Tips:
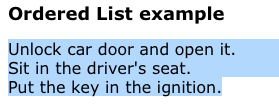
- Ordered lists suggest a progression or sequence.
- As with heading, lists should be used correctly and for the right purposes.
- Unordered and ordered lists should always contain list items.
- Lists should never be used for merely indenting or other layout purposes.
- Avoid manually adding a special character (hyphens/asterisks) or typing numbers one-by-one instead of using lists.
How-to create Lists:
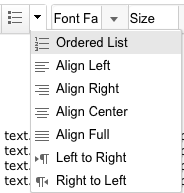
- In TCU Online, within the HTML editor in your content, highlight the content you want to make into a list.
- Then, on the toolbar, click on either the Unordered List icon to create a bullet list, or the Ordered List to create a numbered list.
- Click Update or Publish to save your changes.
Images and Graphics (including Graphs, Maps & Shapes)
Provide alternative text descriptions (Alt Text) for images and shapes. Alternative text provides a textual alternative to non-text content in web pages. The text is read by screen readers in place of images allowing the content and function to be accessible to those with visual or certain cognitive disabilities. It is displayed in place of the images if the image file doesn’t load properly. Remember: Computers and screen readers do not analyze the image and determine what it is presenting. The text must be provided to the user with presents the content and function of the images.
Note: The Accessibility Checker will not check if any alt text provided conveys content and meaning. This requires a manual check by the instructor/course developer.
Alt Text Tips:
- Be accurate and equivalent in presenting the same content and function of the image.
- Be succinct. Typically no more than a few words are necessary to describe content and function.
- NOT be redundant or provide the same information as text within the context of the image.
- NOT use phrases of “image of…” or “graphic of…” to describe the image.
- Context is everything. Place the images on the page in a logical place in relation to the content. The alt text might change depending on the location of the image.
- Decorative images need to marked as such.
How-to add alt text to images:
Note: Avoid adding your image into the HTML editor by dragging it into the editor from your folder. This will not include the forced add Alt Text step.
- In TCU Online, within the HTML editor in your content, place your cursor in the HTML editor window, then click the Insert Image icon on the toolbar.
- Browse to the image location on your computer or in the course offering files. Select the image file then click Open.
- Click the Add button.
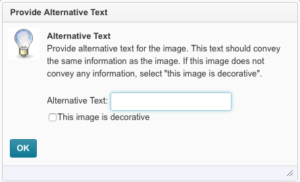
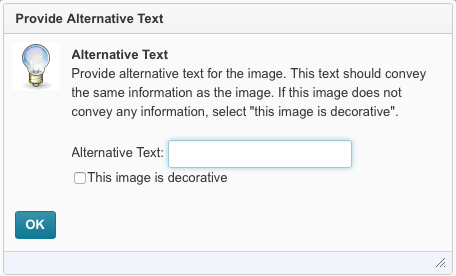
- Then in the Alternative Text field, type a description of the image. It is important to write a description of the image that conveys the content and purpose of the image. If the image is solely for decorative purposes, check the box for “the image is decorative.”
- Click OK and then Update or Publish to save.
Complex images
If your image is complex, such as a chart, graph or map which cannot be described concisely in a few words while presenting the content and function, then you will need to provide more information. So, ask yourself a question, is it possible to get all of the important information about your image by a brief phrase (typically what is used for alt text)? If the answer is no, you MUST provide a more detailed long description.
- Describe the image in surrounding text. If the image is adequately described in the text surrounding the image, including text-based tables, then add a short alt text label so it is clear what the image is and that the student can correlate the image with the description.
- Link out to a webpage with a longer description. The link can be adjacent to the image or the image itself can be linked to the long description page. The alt text for the image should still describe the general content of the image.
- Use a caption. This option requires HTML editing. To do this, you must go to the content in TCU Online and select the HTML editor you wish to edit. Then select the HTML icon to view the HTML code. Locate the area in the code your image is embedded. Use the figure code updating the content in bold to your content. Example code:
<figure> <img src=”TCUstudentsates.jpg” alt=”US Map of TCU student origins” width=”400″ height=”290″ /> <figcaption> <em>Map displays states TCU students originate from. All states are represented in the United States with 50% from Texas, 25% from California and 25% from Nebraska.</em> </figcaption> </figure>
Links
Write meaningful link text that indicates the link’s destination. Links are important to navigation for all users, but especially screen reader users. Links are more useful when meaningful text is used.
Note: The Accessibility Checker will not check if meaningful link text that indicates the link’s destination is missing from a link to a file or URL was created. This requires a manual check by the instructor/course developer.
Link tips:
- Don’t include “link” in the link text because all users already know it is a link.
- Links should make sense out of context. Avoid “click here,” “click for details,” “here,” “read more,” “more,” and “info” for example.
- Avoid overkill including every detail about a link destination.
- If possible, place your links in alphabetical order. This helps with organization and readability.
- Linking out to someone else’s website? Is it accessible? Make sure any pages you link out to are accessible, otherwise your students may have difficulty accessing the material. Check a site’s accessibility with the Wave Web Accessibility Tool.
How-to create links with meaningful text:
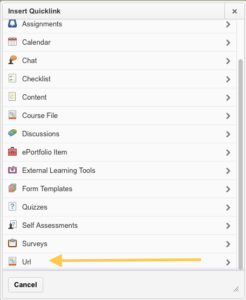
- In TCU Online, within the HTML editor in your content, click the Insert Quicklinks icon from the toolbar in the HTML editor.
- Select URL from the Insert Quicklinks list.
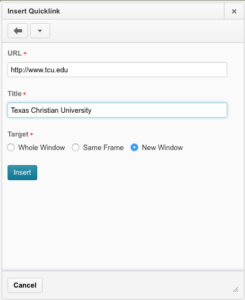
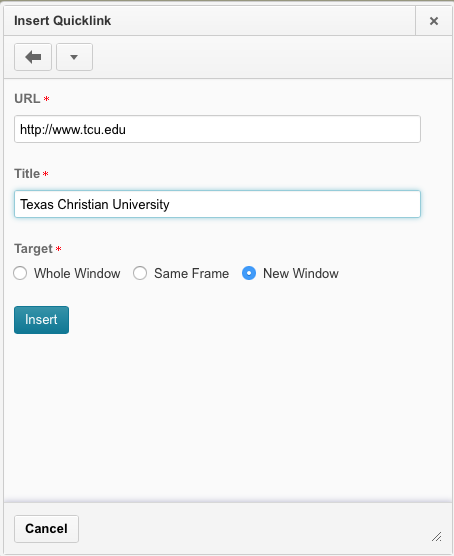
- Type the URL then enter text that describes the link’s destination in the Title field. For example, if you want your link to take you to Texas Christian University’s website, type Texas Christian University website as your title. Avoid typing the url “www.tcu.edu” or click here as your title since they are not descriptive.
- Select “New Window” for the target, then click Insert.
- Click the Update or Publish button to save all of your changes to the page.

Color
Don’t use color alone to convey meaning. Color alone should not be used to make distinction, a comparison or to set something off or apart from the rest of the web page. If you categorize something by color alone, those who are color blind or blind will not benefit from the color distinction.
Note: The Accessibility Checker will not check if color was used to convey meaning. This requires a manual check by the instructor/course developer.
Use sufficient color contrast. If you print your color graphic on a black and white printer, would it be understandable? Without sufficient color contrast, people who are color blind will not be able to benefit from the information. Avoid red & green color combinations – these are often indistinguishable for those with color-blindness.
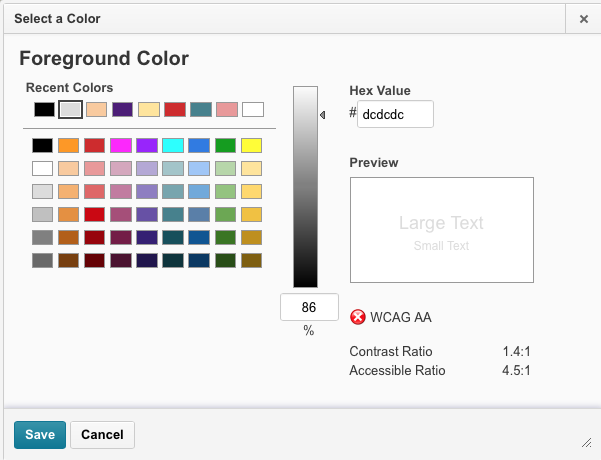
How-to check color contrast in the Color Picker:
- In TCU Online, within the HTML editor in your content, select the text you want to change to another color and click the Color icon on the toolbar.

- Select the color. Note: When picking a color, make sure a color that registers a green checkmark for WCAG AA in the Select a Color window.

Remember, just because a color is available does not make it a good choice. Typically light colors or pastels are poor choices due to their insufficient contrast.
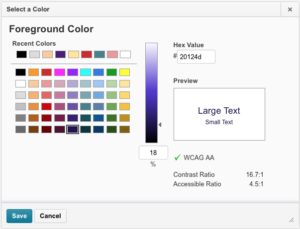
Darker colors are better choices for color contrast. This will earn a WCAG AA checkbox in the color picker.
- Click Save.
- Click the Update or Publish button to save all of your changes to the page.

Tables
Create data tables with column headers. Designating column headers in a table is essential to screen reader users understanding how the information is laid out.
Create data tables with captions. Data tables should have brief descriptive text before or after the table that indicates the content of that table.
Ensure proper reading order in tables. Screen readers read tables from left to right, top to bottom, one cell at a time (no repeats). If cells are split or merged, the reading order can be thrown off.
Read your table left to right, top to bottom (never repeating a cell). Does it make sense? A screen reader reads tables in this way.
Merged, nested, and split cells change the reading order of tables. Make sure you construct your table in a way that accommodates good reading order.
Table Tips:
Avoid using tables for structure/design
How-to create column headers in tables:
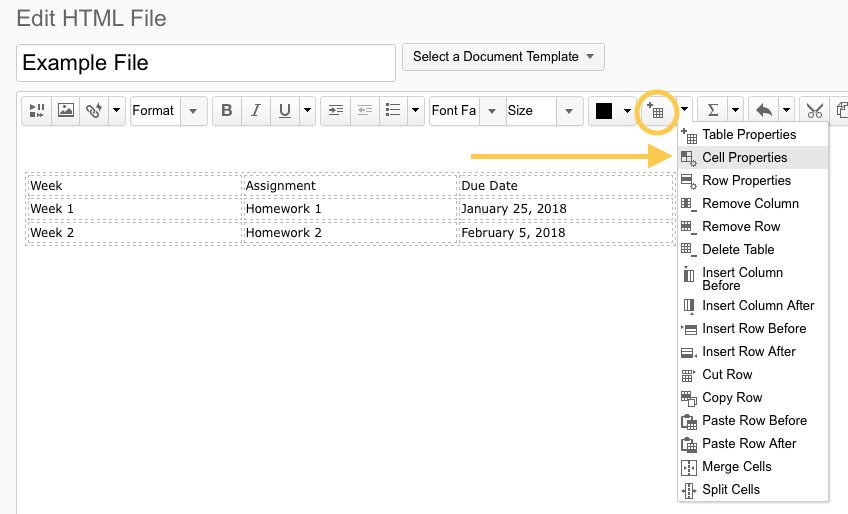
- In TCU Online, within the HTML editor in your content containing a table, click your mouse in one of the cells you want to mark as the table header.
- Click on the drop-down menu next to the Table icon in the toolbar.
- Choose Table Cell Properties. The Table cell properties window will pop-up.

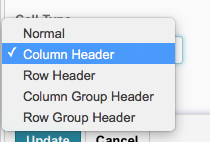
- In the Cell type field, click on the drop-down list and select Column Header (if your cell is the header for a column), or Row Header (if your cell is the header for a row).
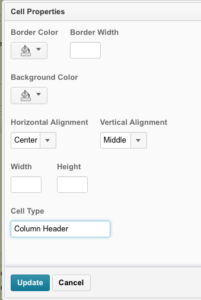
- Click Update. You will know you have successfully changed the row to table headers because the look of the table cells will change.
- Repeat these steps for each additional Column Header or Row Header.
- Click Update or Publish to save your changes.

How-to add a caption to your table
- In TCU Online, within the HTML editor in your content containing a table, click your mouse in one of the cells of your table.
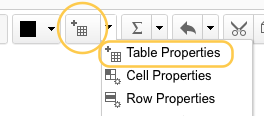
- Click on the drop-down menu next to the Table icon in the toolbar then select Table Properties.
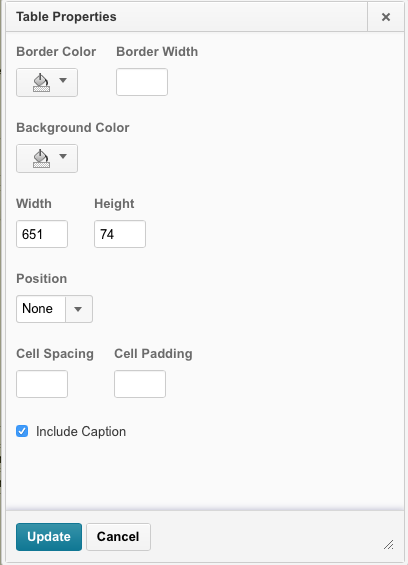
- On the Table Properties pop up window, check the box for Include Captions.

- Click Update.
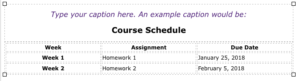
- A small row will display above your table. Click your mouse in this row.

- Type your table caption. This could be a brief description of the table, such as Course Schedule.
- Click Update or Publish to save your changes.


Flashing/Blinking Content
Eliminate or limit blinking/flashing content to 3 seconds. Any flashing/blinking content (especially content in red) can cause seizures in people with photosensitive epilepsy as well as other photosensitive seizure disorders, so it should be limited and used only when necessary. Web pages that do contain flashing content, should limit the flashing to no more than three flashes per second and not use fully saturated reds in the content. If you do have content that flashes/blinks more than three times per second, freeze the blinking content momentarily so it falls below the three times per second limit. If you have a web video with a scene involving very bright lightning flashes (or other scenes with flashes), edit the video so the lightening doesn’t flash more than three times in any one second period.
Interactive Elements, Forms & Buttons
Check the reading order of forms. We recommend the TCU Online quiz tool for creating forms. If you link out to an outside web-based form, check its reading order and how well it works with a screen reader.
Tab order and proper labeling of form fields and buttons is important to those who are blind or physically disabled.
Label form fields and buttons. If you are using the TCU Online Quizzes tool as your form, you can be assured that the form fields and buttons are clearly labeled.
Form Tips:
- To check the reading order of a form, try tabbing through the form. Does it land on the form fields in the order someone would want to fill it out? If it doesn’t you will need to edit the order of the form fields.
- Can you submit the form without using the mouse? (The keyboard command to activate a button or link is the Enter key.) If you cannot, is there another way, that is accessible to students who can’t use a mouse or those who are blind, for the student to submit this information that is accessible to them. Can they save it and email it to you, for example?
- For forms created outside of TCU Online, make sure the form fields are associated with a label. One way to do this is to test the form with a screen reader. Does the screen reader tell the user what to fill into the form fields? Is it clear how to submit the form?
Ensure that any action that uses a mouse can also be completed by a keyboard. Users with carpal tunnel and other mobility issues often cannot use a mouse. While there are more and more input device and software options such as speech to text software and touchpads, keyboard accessibility remains an important input format for many assistive technologies.
- Whatever the operation or behavior, make sure a mouse is not required.
- Try navigate the web page without a mouse.
- Use the following keyboard keys to navigate and interact with the web page all of its content: Tab, Arrow keys, Enter, and/or Spacebar. Keyboard commands clearly provided (and common operating system and browser keyboard commands) may also be used.
- Could you complete the course without using a mouse?
Test interactive learning objects with a screen reader. Even if something is keyboard accessible, objects, buttons or input fields may not be properly labeled which would make the learning object inaccessible to someone using a screen reader.
- If the web page with the interactive object or behavior on the webpage has passed the keyboard only test (above), try it out with a screen reader. Does the screen reader read the button labels?
- Are any changes made to the webpage by scripts or user interaction, made understandable to the blind or low-vision user?
Math and Science equations/formulas/notation
Use MathML to write math and science equations, formulas and notations.The TCU Online equation editor outputs MathML, and you can publish Microsoft Word with the MathType plugin to MathML.
Additional Guidelines
- Software use: Are you requiring your students to use other software applications in your course? Consider the software applications you require students use. Is the software accessible? Is it possible to separate the task or outcome from the application to let students use whatever works best for them? Read the Accessibility Questions for Third-Party Vendors.
- If you upload files to TCU Online, so they appear as content within a module, be sure to update the title of the file so that it is descriptive within the module. Avoid having ENG10803.030sp21syll.docx as a file title that would appear in the module. Instead use “Syllabus” or “Spring 2021 Syllabus.”